Friday, September 20, 2013

5th Wheel RV Remodel


Love Camping? Love your trailer, just wish it didn't look so outdated? You might consider remodeling a few things.  It doesn't have to be expensive .  Here is what I did with our 5th Wheel Travel Trailer. 

To begin with my husband and I do not like brass, light pink, flower curtains, and the lack of personality in our trailer. 

Here is a few BEFORE pictures ...
This is a before shot of the trailer. The floors were a white linoleum, and I put down "Slate Looking"  linoleum squares down.


Our trailer is in great condition just needed to be updated.

The first thing I always do when I start to remodel anything is ..... PAINT!  It is very inexpensive and changes the look very quickly.  I had a gallon of my favorite BEHR RED Paint at home.  It has primer already in it.  I chose a couple accent walls, and started painting.  It took 3 coats before reaching the desired color. 
I applied a silhouette sticker on top of the paint once it was fully dried. You could also paint a silhouette of anything to get the same effect. 
MOD PODGE (found at any craft store) is very important in a travel trailer.  The paint will get bumped and this helps keep the paint from chipping off the wall.  I took MOD PODGE and painted over the paint.  It has a white milky look, but trust me it will dry clear.  I like seeing the paint brush marks, so I purposely left the brush marks showing.  If you don't like this look just take a little bit more time and smooth out the MOD PODGE before it dries.


I used self-adhesive linoleum tiles to cover the old white linoleum. White flooring in a trailer is not a good idea. It shows every spec of dirt and isn't very appealing. There is no need to remove the old linoleum unless it's in very bad disrepair. Start at the door and remove the threshold. Without removing the adhesive backing lay the tile down. Using scissors trim any areas on the tile. Do so before you remove the backing. After you lay the first tile dry fit the next one and so on. For best results, apply each tile as close together as you can.

Next I removed the hideous light pink carpet from under the Master Bed, and stairs. 


Then I purchased grey colored indoor/outdoor carpet. Instead of using the adhesive meant for this type of carpeting, I used a staple gun.  I wanted to make it easy to replace when needed.


I then removed the pink floral detail from the valences.  Once I pulled them off I used the same red paint. Yes, PAINT and put a little on the brush and started painting in a circular motion onto the material. You don't need to remove the valences as long as you use Blue Painters Tape between the wall and valence.  Keep adding more paint until you reach the color you are trying to achieve.  Once dried the paint does not come off.  It looks and feels like the original material.  GREAT MONEY SAVING TIP DON'T YOU THINK?

Notice I also painted the sconce shades. I removed them, took them outside, and spray painted them with red paint we already had. Remove any old dingy curtains. In this case, ugly pink curtains. Curtains are so easy to sew. I found a light brown faux leather material, and sewed new curtains. Just use the old curtains as your pattern for sewing. Using the matching black material from the couch I sewed curtain tie-backs.

Notice behind the stove is just plain boring wallpaper.  This is  a great space to add color. I found these tile sheets at Home Depots clearance section for $5.00 a sheet. I needed four sheets behind the stove so I purchased Five sheets. This way I could use this inexpensive product here-and-there for accents.


Small glass Mosaic tiles are best when tiling in a trailer. The smaller tiles holdup great for trailers that are bouncing around. Hold your sheet of tile on the wall where you need it to go. If you need to cut any tiles use scissors and cut tiles off sheet as needed.

I used Construction adhesive for the back of tile. I applied to the entire back and press on the wall. For best results, use the adhesive that dries clear. It is better to use Construction Adhesive than tile Thin Set. Due to the movement of the trailer this helps keep the tiles from breaking.

For the bathroom:


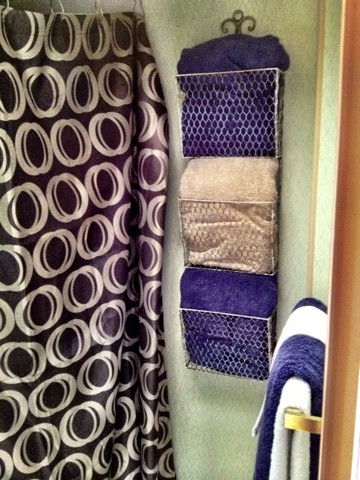
Utilize wall space whenever possible. I found this cute wire rack at Ross for $12.99. It holds our towels leaving room for bathroom supplies under the sink.


  Purchased red sheets, and sewed a pillow that matched the wall, and we are almost done. :)

Chalkboard Refrigerator:
Before:

Notice the refrigerator.... it's okay but a coat of chalkboard paint would look much better. And it keeps the kids entertained when we are camping in the rain.  Plus, I like being able to write out the trips Menu on it too.

After Picture of Refrigerator coming :) 


Handles and Drawer Pulls:
Super simple! Just remove all handles, spray paint with black metal spray paint. Once dried turn over and spray the other side.
Before:


After:


Thank you for checking out my 5th Wheel Trailer Remodel.

Stay tuned for my Motor home Remodel (which I just started). And please share your project pictures, I'd love to see them.

~ Jeannine

Sunday, September 1, 2013

Red Front Door Wreath

Front Door Wreath


Inexpensive and Easy to Make 
I love wreaths, and this one is my favorite. Fun to make and once you add an item, or two it looks great for all occasions
 
Here is what you need:
18" Grapevine wreath
4 Yards of Material or Burlap. Pick a color your like, and a material that doesn't fray
Glue Gun
Glue Sticks

Cut material using square pattern. 
Material Pattern 4" Square:


Fold material in half, then half again. Trim corner of material. Add hot glue to the bottom of the material and add to wreath. As you add another row hot glue the sides of the material together (if you don't want to see the grape vine through the material).


 Add wire to the back of your favorite Holiday Decor, to change the look for all occasions. It's fun how quickly the look can be changed by adding new décor!


Directions for the X and O:


You need:
X wooden letter
O wooden letter
hot glue gun
White craft paint
I added the X and an O covered in rolled roses so for the ever so cute Valentines theme.
1. Start by painting the X and O white. Great projects for kids!


2. Take 1/2" white ribbon, and your hot glue gun.  Start by rolling the ribbon small add a little dot of hot glue to keep it together.  Keep putting a little hot glue on the bottom of the rose as you turn the rose.  Periodocially add a extra amount of ribbon before going around the rose.  This gives it the "rose look."


Thanks to ALL of you for reading, pinning and making your own wreaths!  Don't forget to share your pics!

Tuesday, August 27, 2013

Girls Turqoise and White Butterfly Room

Easy and Inexpensive!
Spice up your kids room with butterflies, turquoise, inexpensive place mats, tissue pom-poms, and clouds. 

Supplies Needed:
1-2 Gallons BEHR "510D-4 Embellished Blue" paint
1 Spray Paint Can in matching Turquoise Color
1 Small Butterfly Punch
1 Large Butterfly Punch
White Copy Paper
12 Dark Turquoise Place mats 
4 Packages of Tissue paper  in white and Turquoise
Stapler
Double sided tape
18 Gauge Wire (purchase at a home supply store not a craft store to save money)
Metal Wreath Frame
Hot Glue Gun
Glue for Glue Gun
Chalkboard Paint
Spanish Moss


Start with BEHR turquoise semi-gloss PAINT.  Paint the entire room, or just one wall if you prefer an accent wall.

  
Purchase a Butterfly Paper Punch.  You will need a Small and Large Butterfly Punch. I purchased mine online from EK Success.                                                                    Large Slim Punch Butterfly - $14.  Small Butterfly Punch $18.
Use copy paper and start punching away.  Kids love using paper punches so let them help you.  You will need about 45 small butterflies, and 100 large butterflies.  Cut small strips of double-sided tape. 

Draw with a pencil a small circle, looping the circle around again.  Erase any pencil marks after butterflies are attached to wall. Tear off one side of tape on double sided tape, attach to body of butterfly.

Start in the center and tear off the other side of tape attach to wall.  Press firmly. 


Start attaching butterflies close, then as you move out of the center attach butterflies a little further apart.

 Find inexpensive place mats, using a stapler attached place mats to one wall in a sporadic pattern.


Branches in Polka Dotted Pail:
For an inexpensive fun accent to the room, get 10-12 thin branches. You can either cut from your backyard, or go to your local craft store.  Spray branches with turquoise spray paint. Let dry then turn branches over and spray paint other side. 
Find a metal pail, I found this polka dotted metal pail at Michael's Craft store. Add floral foam, then add Spanish moss to the top covering the floral foam.  Push branches through moss into floral foam, (then with your left over butterfly punch outs) and Hot glue butterflies to the branches.  Using copy paper cut out small leaves for the end of the branches.  he leaves should be about and inch and half in length.  I used fun turquoise scrapbook pages for a few of my branches.  Voila.....that's it you have a super cute accent to the room.  (I also used this for my daughters centerpiece for her butterfly themed birthday party.  Check out that blog under "Parties" tab. 

How to make Pom-Poms:  (Watch this quick & easy video)

http://youtu.be/bfork_fpbWc
Using fishing line, and thumb tacks, Hang the Pom-Poms in staggering lengths,  group in odd numbers. I choose to hang the Pom-Poms on both sides of the bedroom window. 
How to make Butterfly Chandelier:
Punch another 80 butterflies using the Large Butterfly Punch.  Wrap wire around inner circle of metal wreath frame,  cut wire in 18" lengths. Cut about 10 in this length.  Cut another 10 in 12" lengths.  Start from the bottom, using a hot glue gun and "sandwich" two butterfly pieces together with the wire staying in the center of the butterfly.  Leave an inch space, and glue another until you reach the metal wreath. Continue with all pre-cut metal wire lengths.

Paint Clouds on Ceiling:
If desired paint clouds on the ceiling, or paint the ceiling white.
I went with more cartoon looking clouds vs. realistic looking clouds.  
Look around the room and see what details could use a little Turquoise paint. 

Another fun touch ... paint the closet doors in chalkboard paint.  If your child likes to draw as much as ours, this was a fun way to keep our daughter creative.


I hope this page gave you a few fun ideas.  Don't forget to pin, share your pics, and any questions or comments you may have.
Thanks For Visiting!! 
~ Jeannine